
Linda Power Ashman
By highlighting some of the problems of growing hostas, the reasons for them and offering solutions, I hope to explode some of the myths and bad press these plants receive.
Focus of the talk:
(A) DECISIONS AND DIMENSIONS – Location? Where’s the sun? Choice of plants?
(B) DIVERSITY AND DIFFERENTIATION – Leaf shapes, colours and variations.
(C) DEFENCE – Know your enemies, and their enemies; strategies
(D) DECREPITUDE – Preparation for over-wintering and storage
(E) DILIGENCE AND DEDICATION – a health warning
(F) DEMONSTRATION OF DIVISION AND REDRESSING
Hostas, now formally of the family ‘Hostacea’, are hardy, greedy, clump-forming perennials. They are originally woodland plants, thriving in an environment of leafy cover from surrounding trees and shrubs, where they were mainly green. The plants emerge from below ground and die back completely in Autumn. Ideal growing conditions are anywhere there is some soil and water; they love damp soil by streams and ditches. Hostas have achieved their place in our gardens, however, because of the success of plant breeding which has produced a wide range of varieties, leaf shapes, sizes from large to small and miniature, and colours.
WHAT DO YOU REQUIRE FROM YOUR HOSTAS?
Massed planting, focal points on steps or by garden seats, or either side of a doorway, or for flower arranging? Hostas are generally chosen for their leaves, but if the scapes (flowers) are your thing, then the greatest fragrance is from those hostas of the plantaginea breed line. First decision has to be where does the sun shine in your garden, which will guide choice of size and colour. All hostas require some sun for photosynthesis and to maintain the variegation – just not too much and not too hot. Too much and the variegation pales, too little and the plant returns to its green heritage: the best is the morning, southeasterly light. Take account also of the shade produced by your neighbour’s planting.
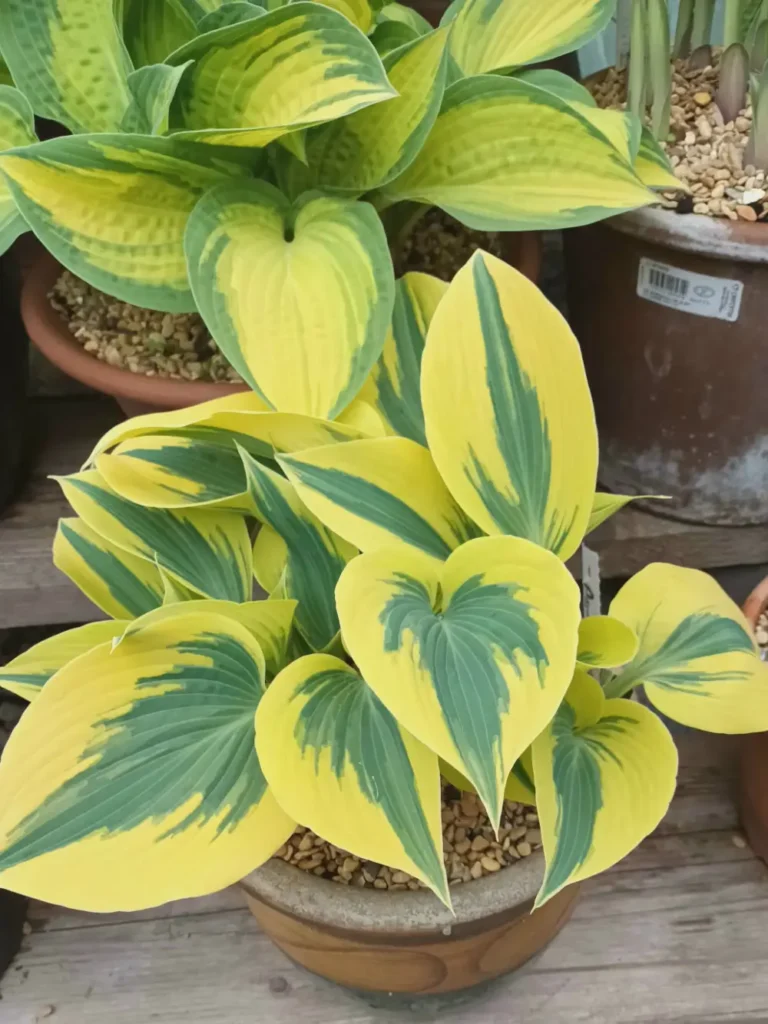
DIVERSITY AND DIFFERENTIATION
We now see wonderfully variegated forms in:
COLOUR– yellow, gold, white, greens from lime to almost black, and the blue of glauca, with central splashes or lined separations
LEAVES, mainly round with variations to oval and lance; with twisted, crimped, piecrust edges; deeply puckered or quilted. Glossy or matt, waxy or bloomed, the leaves themselves can be thick or thin. And the problems? Photosynthesis requires green to occur. Therefore, the greater the variegation, the smaller opportunity for photosynthesis and, therefore, growth. Also, if the plant suffers too much hot sun, the thin leaves burn, the thick leaves scorch, and the waxy or bloomed turn a particularly nasty shade of brown.
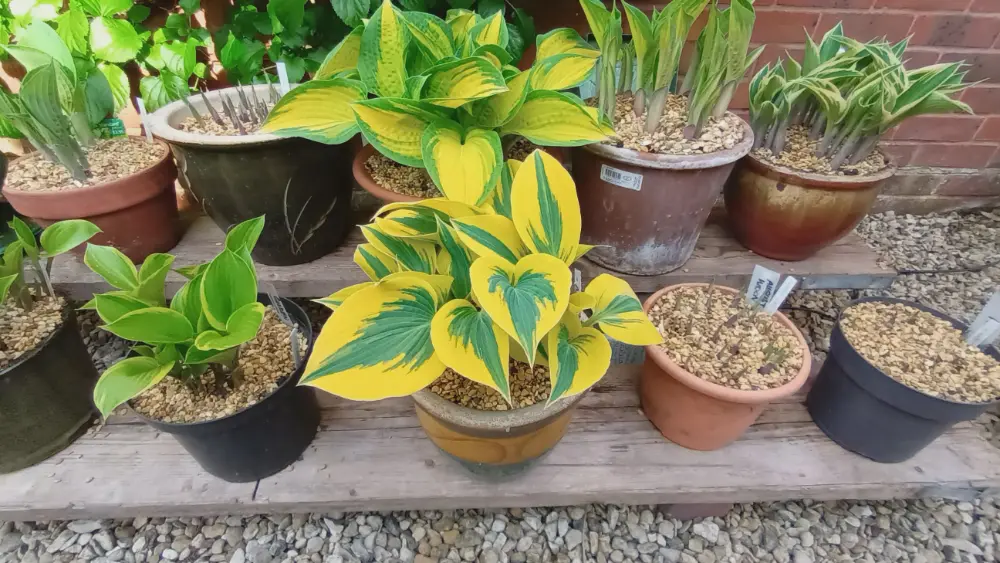
Display your many hostas with pride and admire their varied beauty.
DEFENCE AND THE ENEMIES
Defence is something which must start early, or slug damage will be visible all season unless you cut off the damaged leaf (from the base of the plant, not just the leaf, please). Some readers will remember the time when we had four seasons, with a proper cold winter. Molluscs bred only once. Now, in this time of climate change (whatever that means to you), the research is showing that molluscs are sometimes having four broods a year. The grey slug has potential to produce 90,000 grandchildren; some slugs have 27,000 teeth so you can see how they manage to devour your prize plant in one sitting. Experts calculate a cubic metre of garden on average contains up to 200 slugs. Oh, and throwing them over your neighbour’s garden does not work as they have their own individual scent trails to find their way back. These comments also apply to the snail.
If you think you are overrun with these pests, then you need to mount a prolonged war over a whole season. However, whilst most wildlife has a purpose for balance in the garden, I can find no reason for the vine weevil. Mother vine weevil is a flightless black beetle who moves at night and lays her eggs on the top of your plant, the eggs hatch, and the grubs make their way down the side to feed on the roots. Mother, meanwhile, eats the leaves. If your plant is not thriving, check the roots for the small cream grubs with orange mouth parts.
AND YOUR ENEMIES’ ENEMIES! Encourage into your garden the slug and snail-eating predators. Provide bird feed, birdfeeders and always water for birds who will also like a feed of vine weevil grubs. A pond will encourage frogs to live in your garden and they love a feast of molluscs. Hedgehogs also eat slugs, but they need space to roam between gardens so access/exit through holes in your boundaries will encourage them; also water, food for their young, and a quiet area to rest during the day. And my all-time hero, an all-round good egg, the Carabid beetle. This is a large, black, flightless omnivore which is active at night, resting during the day in the leaf litter, so don’t be too tidy (not to be confused with the vine weevil which is smaller). The carabid’s favourite fodder is slugs and snails, but also eats aphids, earthworms, fly larvae, caterpillars and seeds of weeds: it is known for climbing plants to get at slugs and other pests.
More DEFENCE strategies include:
BARRIERS – Mulches of horticultural grit, eggshells, crushed cocoa shells, wood ash, Strulch arranged in a doughnut not touching the base of the plant or the leaves; in fact anything that might feel rough, sharp, uncomfortable. Top up doughnut periodically, always adding 5/6 slug pellets inside the ring. The downside is this does not deter burrowing slugs. Some people use copper rings in the ground round the plant, allegedly to great effect.
TRAPS – a SLUG PUB will provide a bibulous and pleasant demise. Wind into the soil close to the plant a small dish full of any beer, doesn’t have to be vintage. Place a few all around the garden, not just by a hosta.
TORCHLIGHT SERENADE – on a warm, damp, late spring evening you will see me armed with strong torch, bucket and rubber gloves checking my hostas, and any areas of stones, bricks and pots, for the enemy. If you are squeamish about culling, collect and place in the compost bin, where they will do the job they are in the garden to do. And, of course, you have a compost heap – what’s not to love about free garden nutrition?
NEMATODES – These biological treatments control and treat specific problems. For vine weevil grubs, apply June/July. This method is expensive and slow to work, and has questionable effectiveness against snails.
SLUG PELLETS – use sparingly on wet soil. The recommended use is 5/6 pellets only at each application. Whilst they have a bad press, I find them effective and easy to use. The manufacturers’ research states the blue colour makes them unattractive to other animals, and they are also repellent to household pets.
SPRAYS – when the new and early growth is coming through, and in fact all through the year, I do spray with a standard anti-bug spray. I have also found homemade garlic spray effective but can’t stand the smell.
COMPANION PLANTING – what makes this work is plants with strong smells/fragrances. Cited are the strong-scented mullein, lavender, lambs ear, rock rose, but unfortunately these are plants which like warm sun. However, I have found one in my own garden which works for the few hostas in the ground here, and that is a Geranium Cranesbill which has a beautiful blue flower and a very strong scent. I plan to try Geranium Phaem this year.
All these strategies have a measure of success, but must be repeated, renewed and monitored. Rain will wash off the sprays, mulches need to be replenished, and the doughnut maintained.
DECREPITUDE
When you no longer see any beauty in your hostas, when the leaves have turned a peculiar shade of orange, are soggy and flopped over the pot, gently pull off the dying leaves and stalks. Thoroughly clear the old grit cover to remove any possible mollusc eggs and remove any weeds which have taken root. Refresh the top with new grit, water, and place OUT OF YOUR WAY, i.e. in the shade, along a wall or house wall, in the garage or shed. Leave alone for 4/5 months and monitor in early spring.
DILIGENCE AND DEDICATION
I have hopefully given you reasons why you should buy this plant or not that one, but ultimately we buy with our hearts. You will see the plant breeders at Malvern, fall in love with a beauty on their stand, to be told it is not available – YET. It takes 3-5 years for a particular success to continue to breed true, so buy what you can.
My version of the demonstration that follows might seem to you like major work, but this is done only once a year. Time consuming – yes, but the attention afterwards is a matter of spraying, watering and feeding, and checking for the enemy.
DEMONSTRATION OF DIVISION AND REDRESSING
Plants for this treatment should be at least three years old (and three years since the last division). This takes place in early Spring, which gives the plant chance to recover through the growing season. Autumn division gives the plant a period of dormancy before the new season.
IN A POT:
Look at the plant to analyse what it is telling you. Does it need redressing or dividing? Has the pot itself survived the down season? Roots on the top of the soil might mean the pot is too dry and the roots have come up for surface moisture, or too wet and the roots have come up for the drier soil, or simply that the pot is too small. Is the plant congested and needs dividing, or simply needs refreshing?
A large ceramic, fancy pot, full of grit/clay/compost/soil/mature-ish plant and damp, will be heavy to move comfortably. If that is the case you will not want to bother. Consider using plastic pots to be placed inside your posh ceramic one. If too deep, consider inserting a half-house brick to lift the plastic pot clear of the outer rim. Do not rest your plastic pot onto the decorative pot because it will be difficult to lift out without breaking your nails.
Refresh – remove plant, rake off top to remove any eggs, rake off old surface soil from sides, and slice off a thin section from around the circumference of the plant, down to the roots. Loosen roots and trim strongly. Clean the pot, place shards in the bottom and add a layer of grit for drainage.
Now for the SOIL. Hostas need high fertility, preferably slightly acidic. They are greedy plants, and the bigger the plant the greater the need for good quality soil. Mix our heavy clay with garden compost/farmyard compost/spent mushroom compost/horticultural grit/vermiculite/perlite, all to improve drainage, open the soil, and form sponge-like crumbs to retain moisture. Add a tablespoon of bone meal. Mix. Place a few handfuls of new soil in the bottom, replace the plant, top up with soil forcing it down the sides of the pot to remove air. Leave space at the top for watering. Water and label. Add fresh decorative gravel when the level of the pot has fully settled.
Division – Remove the plant from the pot, check the pot. Using a sharp knife, cut a wedge ensuring a good root supply and pot on as ‘Refresh’. For a total division, cut into portions, each with a good root structure, and pot on as before. Single or small plants can be divided by hand. Ensure that each small plant has a good root supply, and pot on as before. Water and label.
Just a few weeks on, just look how beautiful the Autumn Gold hosta is looking! And people thought I’d killed it!!
IN THE GROUND
Divide a congested plant using the two forks method, or by a wedge division. Replant by creating a hole twice the size of the resulting plant, fork over the base of the hole and add a handful of chicken pellets. Refill. Water. Label. Mulch.
WATERING
Early morning, to the base of the plant in pot/ground, not on leaf UNLESS we have a period of warm, dusty weather, then use a spray wand, or watering can with rose inverted for a gentle mist to spray leaves to remove dust which restricts photosynthesis. Early evening watering encourages snails and slugs.
FEEDING
Pots – Growmore or other general fertiliser. I use a weak feed of Tomorite added to my watering can every two/three weeks.
Calendar for ground planting:
– Spring – chicken pellets for leaf development in planting hole
– Summer – tomato feed for support of plant
– Autumn – bone meal for root growth.
AND LABEL – No label or a missing label means you will not know for sure what it is you are giving to a friend. When you set them aside for the winter, write several new labels and put several in one pot. Come next February, believe me, they will all look the same, and I have quite a number of plants with the same name – GOK – God Only Knows!
LINDA POWER-ASHMAN. MARCH 2025